A common reason for being disconnected from a wireless network laptop keeps dropping out from your wireless network is that you have a low WiFi signal. Your router or Wireless networks have a limited range, Loss cable, outdated/broken router/modem model. so try Reset your router, restart your computer devices, his help you reset your network settings and fix your network issues, Update your WiFi adapter drivers and WiFi router firmware, check if the router or Wireless networks have a limited range.
If your laptop keeps losing wifi connection or windows 10 internet disconnects randomly, here a few workarounds you can try to get your WiFi connection stable again. Here’re few steps you can try to get your WiFi connection stable again. Just work your way through the list until your problem is resolved.
What are the causes of WiFi keeps Disconnecting on Windows 10?
- Corrupted/Outdated Wireless Drivers
- Power Management Issue
- Home Network marked as Public.
- Intel PROSet/Wireless WiFi Connection Utility Conflict
- Run Network Troubleshooter
- The Wi-Fi driver software isn't updated. Ensure that your drivers are always up to date in order to fix any bugs, compatibility issues, and so forth.
- Try Reset the Wi-Fi AutoConfig services
- Check power-saving mode setting of Wireless adapter
- Disabling Power-saving feature of Adaptor
- Use Google DNS, Set Preferred DNS server to 8.8.8.8, and Alternate DNS server to 8.8.4.4.
- Reset TCP/IP configuration
- Fix Power Management Issues
- Reset Network Connection/setting by enable & desable
- Update the Network Drivers / Update Hardware Firmware
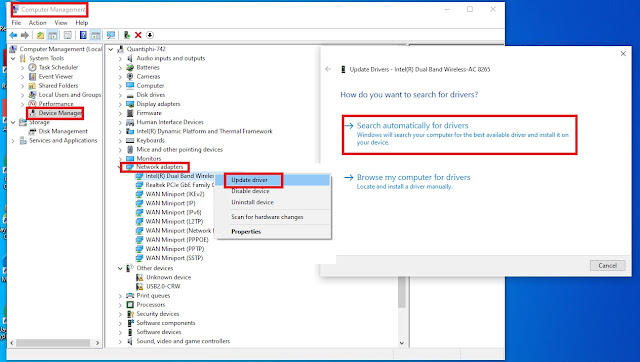
- At first, Press Windows key + R, type devmgmt.msc and press Enter. It will open the device manager.
- Then, Expand Network Adapters.
- Now, Right-click on the WiFi driver and select Update Driver Software.
- Then, Choose Search automatically for updated driver software.
- Follow on-screen instructions, you also should do it for other network adapters and restart your PC.
- Right-click on the network (LAN) icon in the right end of the taskbar, and click on Open Network & Internet Settings.
- In the settings app that opens, click on Change adapter options in the right pane.
- Right-click on the network you want to configure, and click on Properties.
- Click on Internet Protocol Version 4 (IPv4) in the list and then click on Properties.
- Under the General tab, choose ‘Use the following DNS server addresses’ and put the following DNS addresses.
FAQ


